Jul 4, 2021
Build a blog using Jekyll
Jekyll is a static site generator that makes building static sites a simple and seamless process
There is an almost infinite number of ways to build a blog site. One route is to use sites such as Wordpress, SquareSpace, and Ghost. This is a no-code approach which is efficient and straightforward in its own right. The other route is to write/code a blog site from scratch. In the past, this required building either a full-blown application with a backend, database, and frontend to display the posts, or a static site that required writing entire web templates for each post which is a tedious task to say the least.
Static site generators, which make use of a set of templates and raw files to build a ready to serve HTML website, changed the way blogs can be built significantly. With this comes benefits such as:
- Security: Since no database needs to be configured, there’s little attack surface for static sites
- Fast page-load speeds
- Little to no maintenance of the website architecture
- Free hosting fees: You can deploy your site for free using Github page, Gitlab pages, or Netlify.
There are many static site generators and ever since the rise of Javascript frameworks, static site generators have increased in number tremendously. Some popular static site generators include Gatsby JS, Next JS, Hugo, Jekyll, Eleventy, and many more. You can peruse an exhaustive list on staticsitegenerators.net. This article will take a look at Jekyll and how to build a simple blog using this static site generator.
Jekyll is a great static site generator because it has very few dependencies, is relatively easy to learn, and abstracts so many often complex operations such as URL manipulation, pagination, and more. In fact, if I dare say, it is the simplest static site generator I have ever used. It is so simple that all you need to have the site set up is one file, the _config.yml file. I digress so let’s delve into how to actually set up a Jekyll site.
For our example, we’ll build a simple site that displays an article list and displays each article using a unique article layout.
Table of Contents
- I. Prerequisities
- II. Install prerequisites
- II. Create a Jekyll site.
- III. Defining templates
- IV. Homepage is where the art is! 😊️
- V. Our First Post
- VI. Styling and Finishing touches.
- Fin!
I. Prerequisities
- Ruby version 2.4.0 or higher
- Ruby Gems
- GCC and Make
- Some familiarity with HTML & CSS
The next section will go over how to install the prerequisites. I’ll demonstrate how to do so on Ubuntu-based Linux system. If you’re on another platform, please check out this link to see how to install the prerequisites for your particular OS.
II. Install prerequisites
# The following command install ruby and ruby gems,
# development packages which include GCC and Make,
# as well as the compression library z-lib
sudo apt-get install ruby-full build-essential zlib1g-dev
Next configure a gem installation directory to avoid installing ruby gems as root user. I use the zsh shell but if you’re using bash, simply replace ~/.zshrc in the commands below ith ~/.bashrc
echo '# Install Ruby Gems to ~/gems' >> ~/.zshrc
echo 'export GEM_HOME="$HOME/gems"' >> ~/.zshrc
echo 'export PATH="$HOME/gems/bin:$PATH"' >> ~/.zshrc
source ~/.zshrc
Finally, you can install the Jekyll ruby gem and Bundler.
gem install jekyll bundler
If your run into any issues, don’t panic. Looking up the error online should be able to help. Jekyll has great documentation and a large community of users. If you face an issue, someone has probably faced it before 😉️
II. Create a Jekyll site.
# create a directory and call it anything you like
# I called mine jekyll-blog
mkdir jekyll-blog
After you have created your working directory, you’ll need to create a number of files that we’ll be using to build our site. Below, I’ve outline the directory structure for the site.
.
├── assets
│   └── style.css
├── _config.yml
├── index.html
├── _layouts
│   ├── default.html
│   └── post.html
├── _includes
│   ├── article-item.html
│   └── article-list.html
└── _posts
    └── 2021-07-04-static-sites-are-liberating.md
Inside the _config.yml file, add some site metadata to describe our site.
title: Jekyll Blog
description: This is my first Jekyll site. Yay 🔥️
Once you’ve populated the configuration file with some metadata, you can now run the jekyll server from your root directory.
jekyll serve
# the output should look something like this:
Configuration file: /home/mutsinzi/projects/jekyll-blog/_config.yml
            Source: /home/mutsinzi/projects/jekyll-blog
       Destination: /home/mutsinzi/projects/jekyll-blog/_site
 Incremental build: disabled. Enable with --incremental
      Generating...
                    done in 0.024 seconds.
 Auto-regeneration: enabled for '/home/mutsinzi/projects/jekyll-blog'
    Server address: http://127.0.0.1:4000
  Server running... press ctrl-c to stop.
If you go to locahost:4000 in your browser, you will be able to access the site. Congratulations, you’ve created your first jekyll site. Unfortunately, it’s blank and we can’t really do much with it. The next section will cover how to create templates that we can use to display our pages.
III. Defining templates
Jekyll uses template files inside the _layouts folder to define what a page or post should look like. Jekyll templates use the liquid templating language to build the layouts. If it’s your first time working with liquid, you can check out the official documentation or watch this wonderful introduction by CloudCannon.
Let’s begin by defining a default layout file. Inside the _layouts folder, create a default.html file if you haven’t already.
Then populate the default layout file with the following template. If you’re familiar with HTML, then the following will seem intuitive.
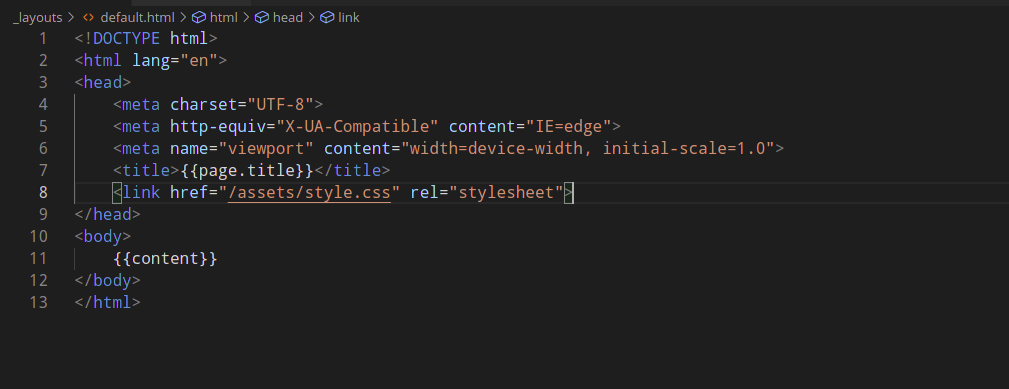
{{page.title}} extracts the title from the liquid front matter on each page or post. This will make sense after we write code for our home page and our sample article.
{{content}} represents the children of the default template. In other words the page or post that will inherit this template is what is represented by {{content}}
Next, let’s define our post layout. On our post layout, we want to display the post title, the post description, and then display our post content. These properties are defined in our liquid front matter inside our post markdown files. We’ll get to this in a bit.
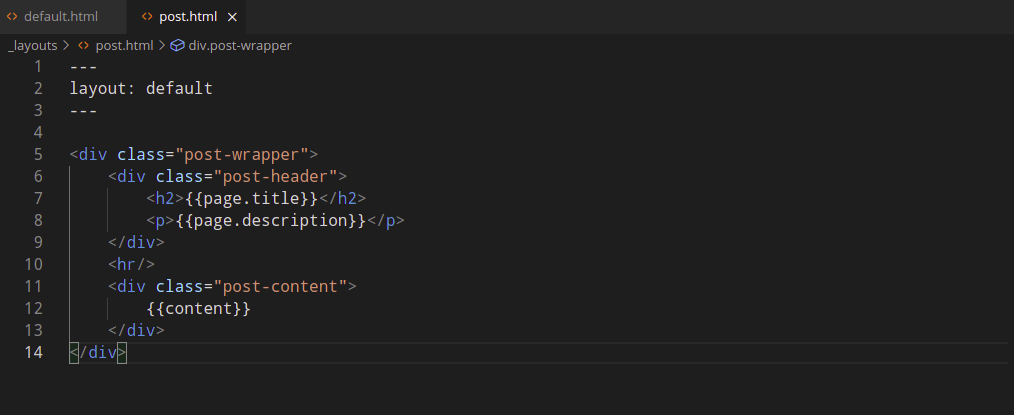
The front matter at the top of our file tells our post layout file to inherit the default layout. This is useful because we don’t have to rewrite our html wrapper
Lovely, that’s it for our templates. Next, we’ll work on our homepage.
IV. Homepage is where the art is! 😊️
The homepage for jekyll sites is the index.html file or index.md file. For our example, we’ll be using index.html. Our homepage will display the site title, and a list of our articles. The article will have a link that allows us to view the post.
Before we begin, I want to introduce an important liquid tag that allows us to loop over our posts. The concept of includes will also be covered.
Includes are snippets of reusable code that we can insert in our pages or posts. A good example of an include is a social media sharing list. Instead of writing it for every page, we can simply write it once and include it in any desired page. Let’s create an article list include and an article item include to get a better understanding of this concept.
Articles List Include
Our articles list include, _includes/article-list.html, will loop over our posts and then display an article item.
<div class="articles-list--container">
<ol>

<!-- the following line loops over posts located in _posts directory -->
{% for article in site.posts %}
<!-- the capture tag sets a variable that
     we can then pass to our article item include -->
<!-- if you've worked with React, this is similar to component props -->
{% capture title %}{{article.title}}{% endcapture %}
{% capture description %}{{article.description}}{% endcapture %}
{% capture url %}{{article.url}}{% endcapture %}
{% include article-item.html title=title url=url description=description %}
{% endfor %}

</ol>
</div>
The code snippet above shows how to loop over our posts, how to define variables and how to pass variables to an include. These are super useful concepts that make the development workflow alot smoother
The Article Item Include
The article item include, _includes/article-item.html, inherits the information we pass it in our article list include and displays it as a list item. Breaking down our components like this is a good way to decouple our site and will save you a lot of time when debugging.
<li class="article-list-item">

    <h3><a href="{{include.url}}">{{include.title}}</a></h3>
    <p>{{include.description}}</p>

</li>
<hr/>
That’s it. Next, let’s tie it all together by including our article list include on our homepage.
The homepage
We’ll begin by adding the necessary frontmatter to allow our homepage to inherit the default layout. Next, we’ll add a title to our front matter. Finally we add some html markup to display the site title and our article list.
Navigate to index.html and add the following code:

If you navigate to localhost:4000, you should see something like this.

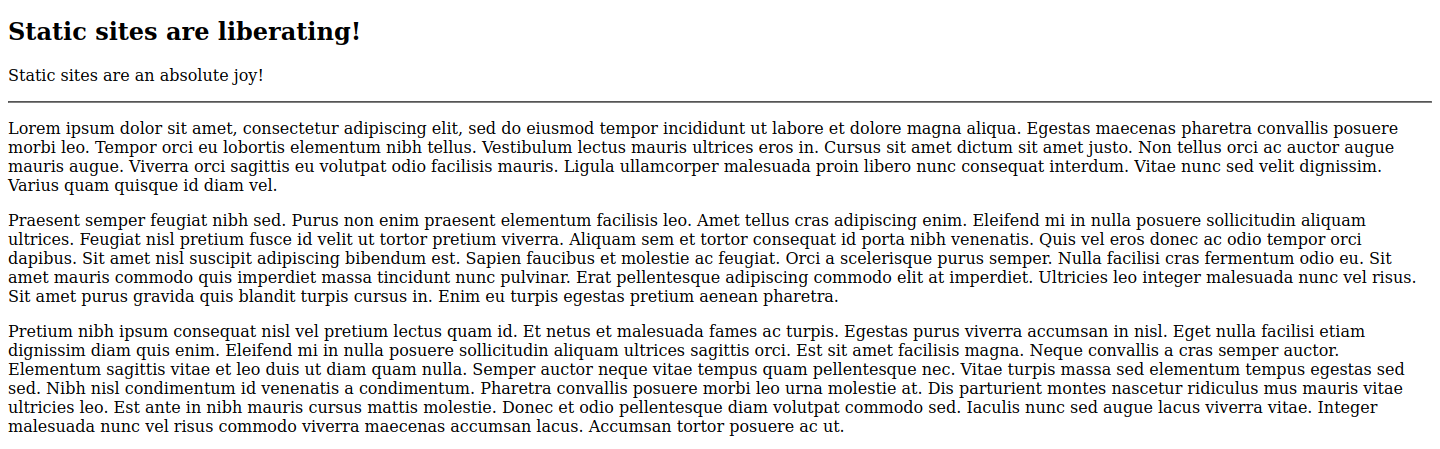
The article in the screenshot shows up because we’ve created a file called 2021-07-04-static-sites-are-liberating-md inside the _posts folder. Notice how jekyll extracts the title from the path neatly? The prefix represents the date of publishing and is considered the default publishing date if we don’t provide one in the post front matter. Try adding another file inside _posts folder using the same filename structure.
Next, let’s work on our first post. Right now if you click the link, it’ll take you to a blank page. That’s because our post is empty.
V. Our First Post
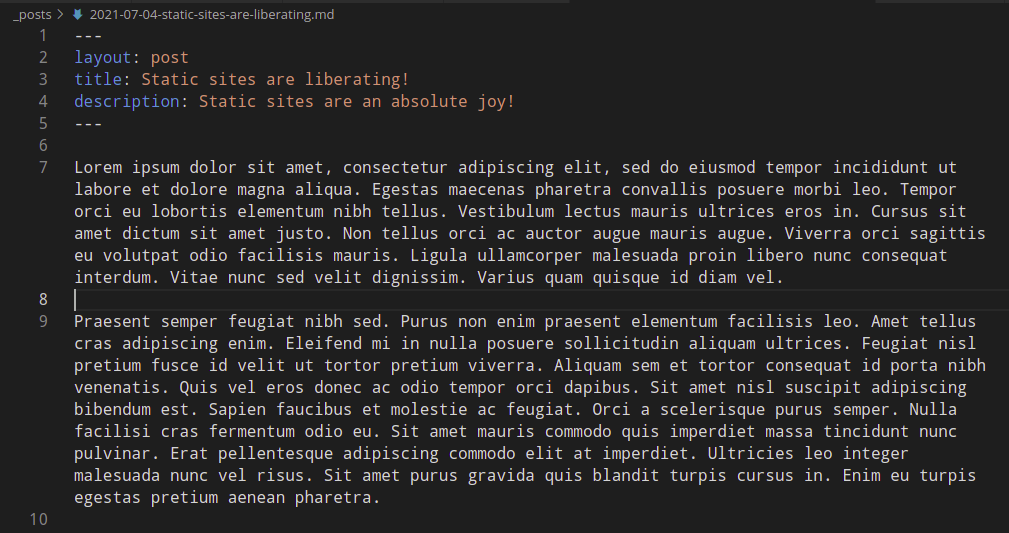
Navigate to _posts/2021-07-04-static-sites-are-liberating-md and populate it with the following.
You can get the placeholder text from this link.
Now you should be able to view your post when you click the link on the homepage.
Jekyll posts are written using the Markdown markup language. I’ve covered the markdown syntax in a past article and you can check it out here if you’re not familiar with it.
As far as setting up our blog goes, we’re now in good shape. Go ahead and add some more articles if you’d like. The final thing I’d like to do is add a bit of styling to clean up our markup and make it easier on the eye. I’ll also add a back button to our post layout to help the reader navigate back to the article list.
VI. Styling and Finishing touches.
Inside the assets/style.css file, add the following styling:
body {
  background: #f1f1f1;
  font-family: -apple-system, BlinkMacSystemFont, "Segoe UI", Roboto, Helvetica, Arial, sans-serif, "Apple Color Emoji", "Segoe UI Emoji", "Segoe UI Symbol";
  margin: 0;
  padding: 0;
  font-size: .8rem;
}
/* homepage and post layout */
  .homepage-container-inner, .post-wrapper{
      max-width: 768px;
      margin: 0 auto;
      padding: .8rem;
  }
  .homepage-header{
      text-align: center;
      margin-bottom: 3rem;
  }
  /* article list */
  ol{
      list-style: none;
  }
  /* article list item */
  li.article-list-item{
    background-color: #fff;
    padding: 1rem;
  }
  hr{
      border-width: 0;
  }
Back in our post layout file, let’s add a back link that will direct the user to our homepage. Let’s place it directly above the post title like so:
---
layout: default
---
<div class="post-wrapper">

    <div class="post-header">
        <a href='/'>back to homepage</a>
        <h2>{{page.title}}</h2>
        <p>{{page.description}}</p>
    </div>
    <hr/>
    <div class="post-content">
        {{content}}
    </div>

</div>
Fin!
If you’ve made it this far, then congrats, you’ve built your first Jekyll blog. If you want to deploy it online, there are a couple of options. I recommend using netlify because it’s one of the simplest ways. Github pages is also a pretty friendly option. I’ll leave this part to you. Happy hacking!